Documentation
Last modified: September 01, 2024
Table of Contents
Projects
General
Overview
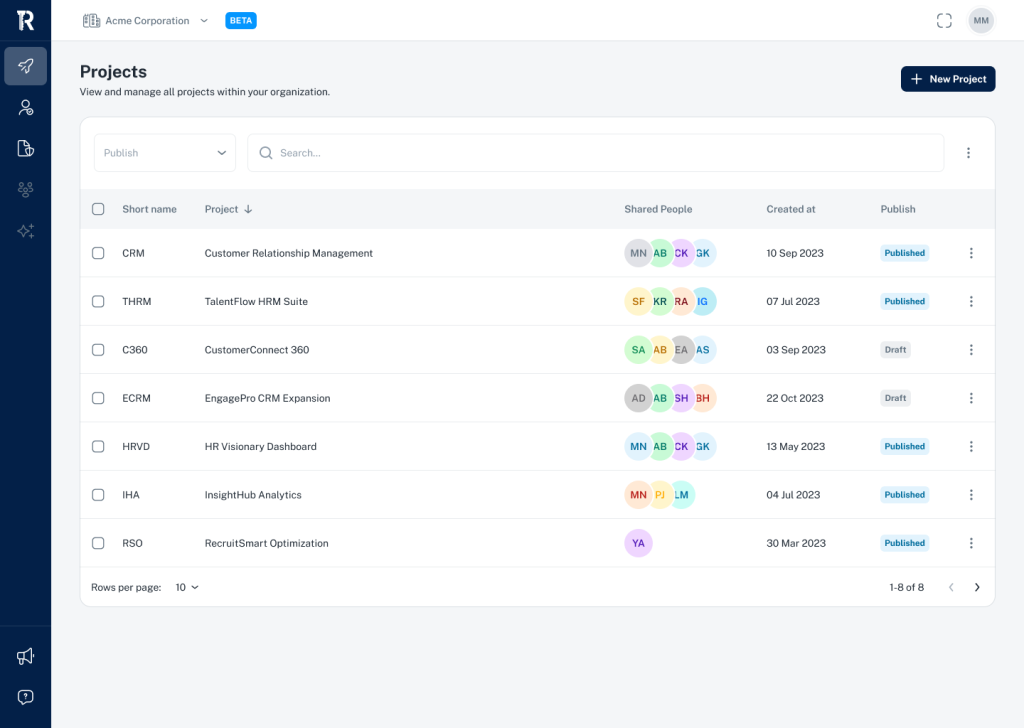
The Projects section in Roleper allows you to view, manage, and organize all the projects within your organization. This is where you can create new projects, monitor existing ones, and manage the people involved in each project.
Step-by-Step Guide
Accessing the Projects Section
- Once logged in, navigate to the left-hand side menu and click on the Projects icon (it looks like a rocket or airplane). This will open the Projects page, where you can see a list of all your organization’s projects.
Understanding the Projects List
- The Projects list displays key details about each project:
- Short Name: A brief identifier for the project.
- Project: The full name of the project.
- Shared People: Shows the initials or avatars of the users who have access to the project.
- Created At: The date when the project was created.
- Publish: Indicates the publication status of the project (Published, Draft, etc.).
- The Projects list displays key details about each project:
Searching for a Project
- Use the Search bar at the top of the list to quickly find a project by its name or short name.
Sorting Projects
- Click on the column headers (e.g., “Short name,” “Project,” “Created at”) to sort the projects alphabetically, by date, or by any other criteria.
Creating a New Project
- To create a new project, click the + New Project button in the top right corner of the screen.
- Fill in the required details such as Project Name, Description, and assign relevant team members.
- Once completed, click Save to add the project to your list.
Managing Existing Projects
- To manage an existing project, click on the three dots (ellipsis) next to the project you want to manage.
- Options available may include editing project details, adding/removing team members, changing the project’s status (Draft, Published), or deleting the project.
Publishing a Project
- Projects that are ready to be shared can be published by clicking the Publish button next to the project’s name. Published projects will be accessible to all assigned team members.
Folders
Overview
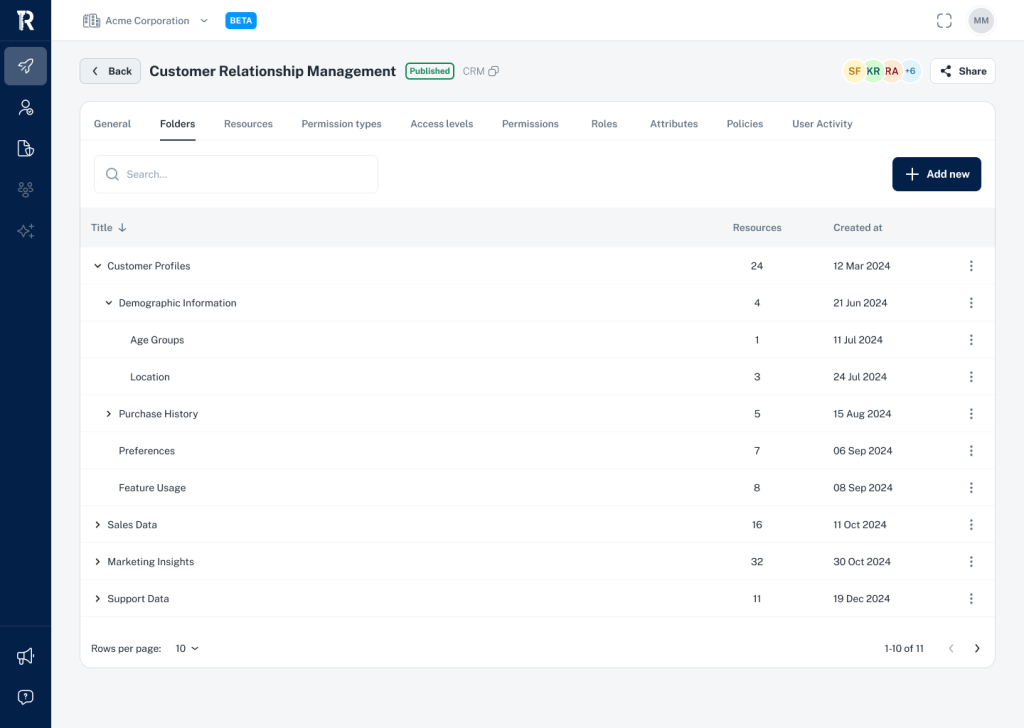
The Folders section within a project in Roleper allows you to organize and manage the resources associated with that project. You can create folders to categorize resources, making it easier to access and manage data related to different aspects of the project.
Step-by-Step Guide
Accessing the Folders Section
- Within your selected project (e.g., “Customer Relationship Management”), navigate to the Folders tab. This section displays all the folders and sub-folders where project resources are stored.
Understanding the Folders List
- The list is organized into folders and sub-folders, making it easy to categorize and find specific resources.
- Title: The name of the folder or sub-folder.
- Resources: Indicates the number of resources (documents, files, etc.) contained within that folder.
- Created At: The date the folder was created, helping you track the timeline of your project’s organization.
Navigating Through Folders
- Click on the arrow next to a folder name to expand or collapse its contents, revealing sub-folders and the resources within them.
- Sub-folders (e.g., “Demographic Information” under “Customer Profiles”) further organize the data into manageable segments.
Searching for a Folder
- Use the Search bar at the top of the list to quickly locate a specific folder by name.
Creating a New Folder
- To create a new folder, click the + Add new button in the top right corner.
- Provide a name for the folder, and select or create sub-folders if needed.
- Once completed, click Save to add the folder to the list.
Managing Existing Folders
- To manage an existing folder, click on the three dots (ellipsis) next to the folder you want to manage.
- Options available may include renaming the folder, moving it within the hierarchy, or deleting it.
Resources
Overview
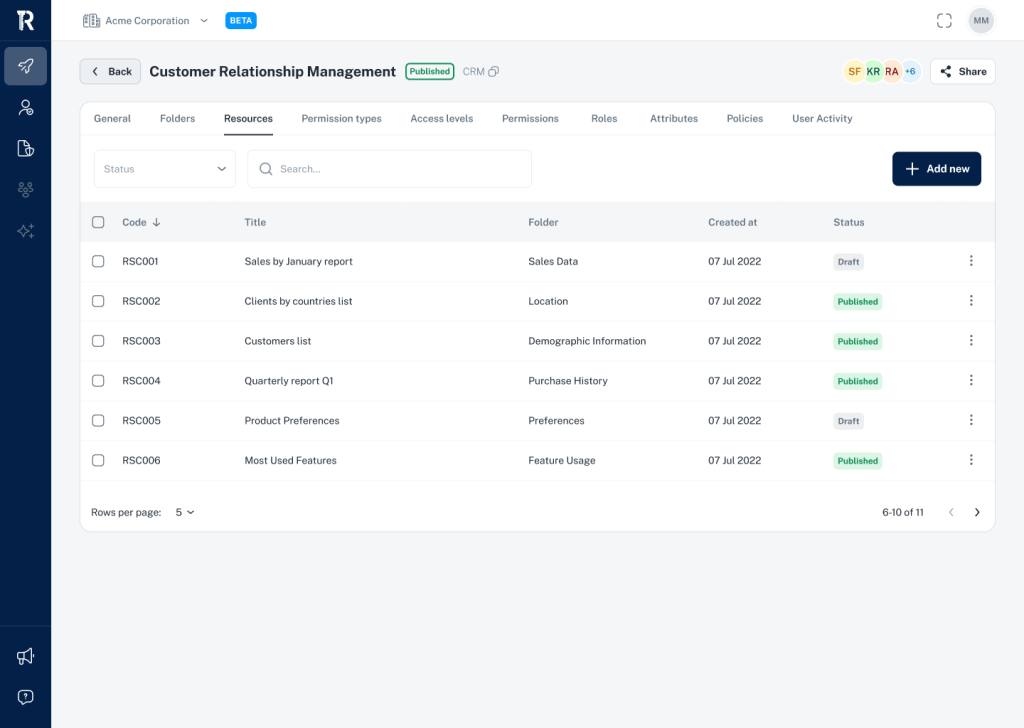
The Resources section within a project in Roleper allows you to manage and organize the various documents, reports, and other resources associated with the project. This section also enables you to control permissions and access levels for each resource.
Step-by-Step Guide
Accessing the Resources Section
- Within your selected project (e.g., “Customer Relationship Management”), navigate to the Resources tab. This section displays all the resources associated with the project.
Understanding the Resources List
- The list is organized by:
- Code: A unique identifier for each resource.
- Title: The name of the resource (e.g., “Sales by January report”).
- Folder: The folder where the resource is stored.
- Created at: The date when the resource was created.
- Status: Indicates whether the resource is in Draft or Published status.
- The list is organized by:
Searching for a Resource
- Use the Search bar at the top of the list to quickly locate a specific resource by its code or title.
Creating a New Resource
- To add a new resource, click the + Add new button in the top right corner.
- Provide the necessary details such as the title, select the folder, and upload the resource file.
- Once completed, click Save to add the resource to your list.
Managing Existing Resources
- To manage an existing resource, click on the three dots (ellipsis) next to the resource you want to edit.
- Options available may include editing resource details, moving it to a different folder, changing its status (Draft, Published), or deleting it.
Editing Permission Types and Access Levels
Permission Types:
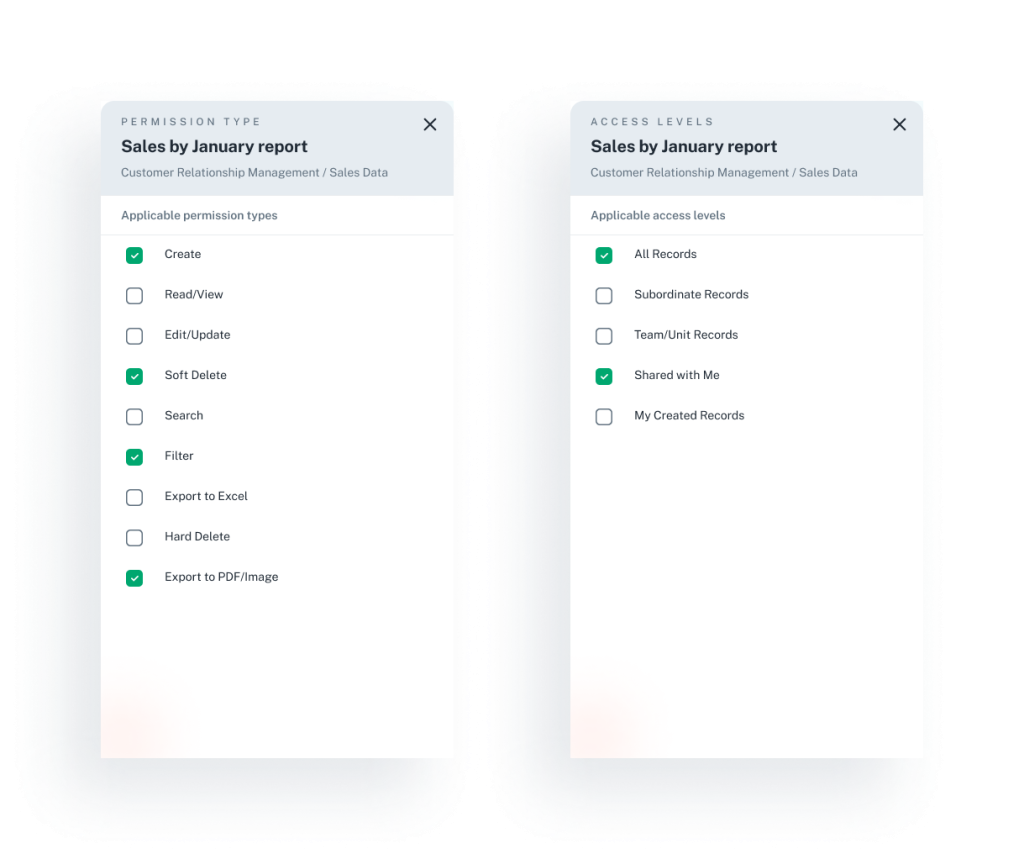
- Click on the resource you wish to edit (e.g., “Sales by January report”).
- A side panel will appear where you can select applicable permission types.
- Permission types include options like Create, Read/View, Edit/Update, Soft Delete, Filter, Export to Excel, Hard Delete, and Export to PDF/Image.
- Check or uncheck the boxes based on the permissions you want to assign for this resource.
Access Levels:
- Next to the Permission Types tab, you’ll find the Access Levels tab.
- This panel allows you to define who can access the resource, with options such as All Records, Subordinate Records, Team/Unit Records, Shared with Me, and My Created Records.
- Select the appropriate access levels by checking or unchecking the boxes.
Saving Changes
- After configuring the permission types and access levels, make sure to click Save to apply the changes.
Permission types
Overview
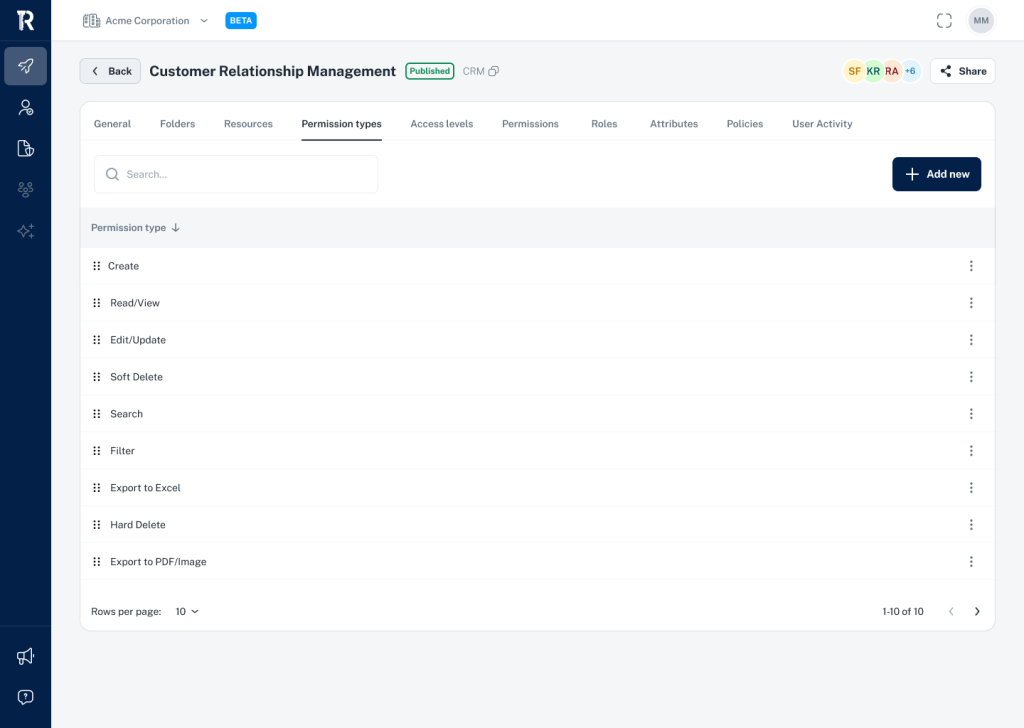
The Permission Types section in Roleper allows you to dynamically create and manage different types of permissions that can be assigned to resources within a project. These permissions determine the actions that users can perform on specific resources, ensuring controlled and secure access.
Step-by-Step Guide
Accessing the Permission Types Section
- Within your selected project (e.g., “Customer Relationship Management”), navigate to the Permission types tab. This section displays all the permission types that can be applied to resources within the project.
Understanding the Permission Types List
- The list displays existing permission types, such as:
- Create: Allows users to create new resources.
- Read/View: Grants users the ability to view resources.
- Edit/Update: Permits users to make changes to existing resources.
- Soft Delete: Allows users to mark resources as deleted without permanently removing them.
- Search: Enables users to search within the resources.
- Filter: Permits users to apply filters to resource data.
- Export to Excel: Grants users the ability to export resource data to Excel.
- Hard Delete: Allows users to permanently delete resources.
- Export to PDF/Image: Enables users to export resource data to PDF or image formats.
- The list displays existing permission types, such as:
Creating a New Permission Type
- To create a new permission type, click the + Add new button in the top right corner.
- Define the name of the permission and specify the actions it will allow.
- Permission types are dynamic, meaning you can tailor them to your specific project needs.
- Once completed, click Save to add the new permission type to your list.
Managing Existing Permission Types
- To manage an existing permission type, click on the three dots (ellipsis) next to the permission type you want to edit.
- Options available may include renaming the permission type, updating its actions, or deleting it.
Using Permission Types in Resources
- Once permission types are defined, they can be applied to specific resources within the Resources section of the project.
- This allows you to control what actions different users can perform on each resource, enhancing security and access management within your project.
Access levels
Overview
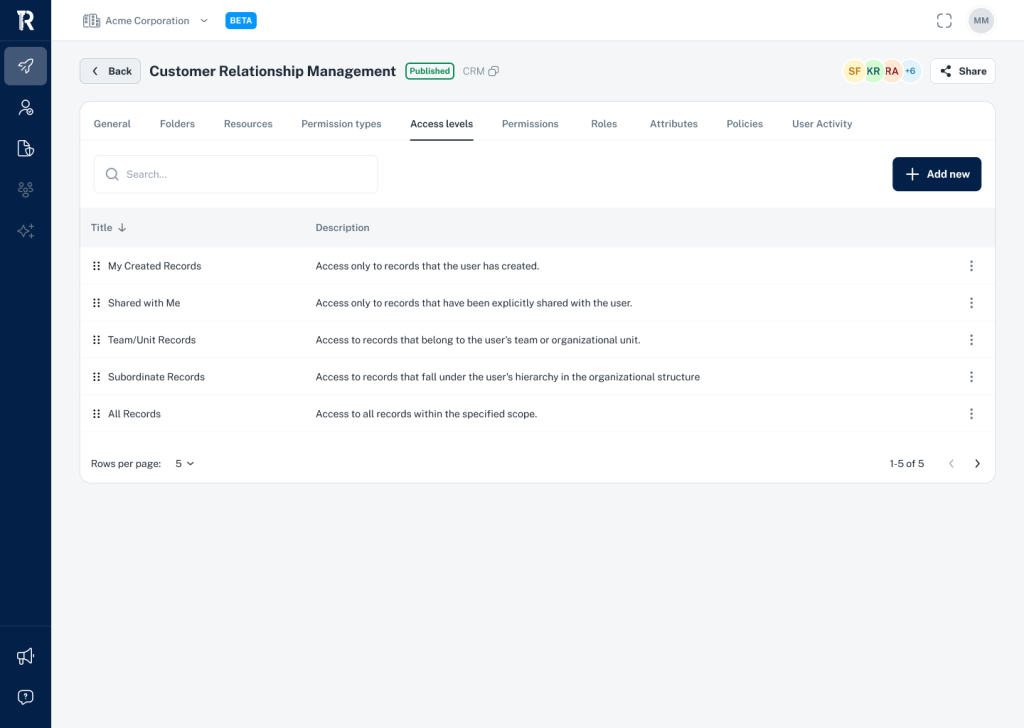
The Access Levels section in Roleper allows you to define and manage different access levels that can be assigned to users for specific resources within a project. These access levels determine the scope of records a user can access, ensuring that data is securely managed according to organizational roles and hierarchies.
Step-by-Step Guide
Accessing the Access Levels Section
- Within your selected project (e.g., “Customer Relationship Management”), navigate to the Access levels tab. This section displays all the available access levels that can be applied to resources within the project.
Understanding the Access Levels List
- The list displays the existing access levels, including:
- My Created Records: Grants access only to records that the user has created.
- Shared with Me: Allows access only to records that have been explicitly shared with the user.
- Team/Unit Records: Provides access to records that belong to the user’s team or organizational unit.
- Subordinate Records: Grants access to records that fall under the user’s hierarchy in the organizational structure.
- All Records: Allows access to all records within the specified scope of the project.
- The list displays the existing access levels, including:
Creating a New Access Level
- To create a new access level, click the + Add new button in the top right corner.
- Define the title of the access level and provide a clear description of what records this access level will allow users to see or manage.
- Once completed, click Save to add the new access level to your list.
Managing Existing Access Levels
- To manage an existing access level, click on the three dots (ellipsis) next to the access level you want to edit.
- Options available may include renaming the access level, updating its description, or deleting it.
Using Access Levels in Resources
- Once access levels are defined, they can be applied to specific resources within the Resources section of the project.
- This ensures that each user can only access the records that are appropriate for their role and organizational level, maintaining data security and integrity.
Permissions
Overview
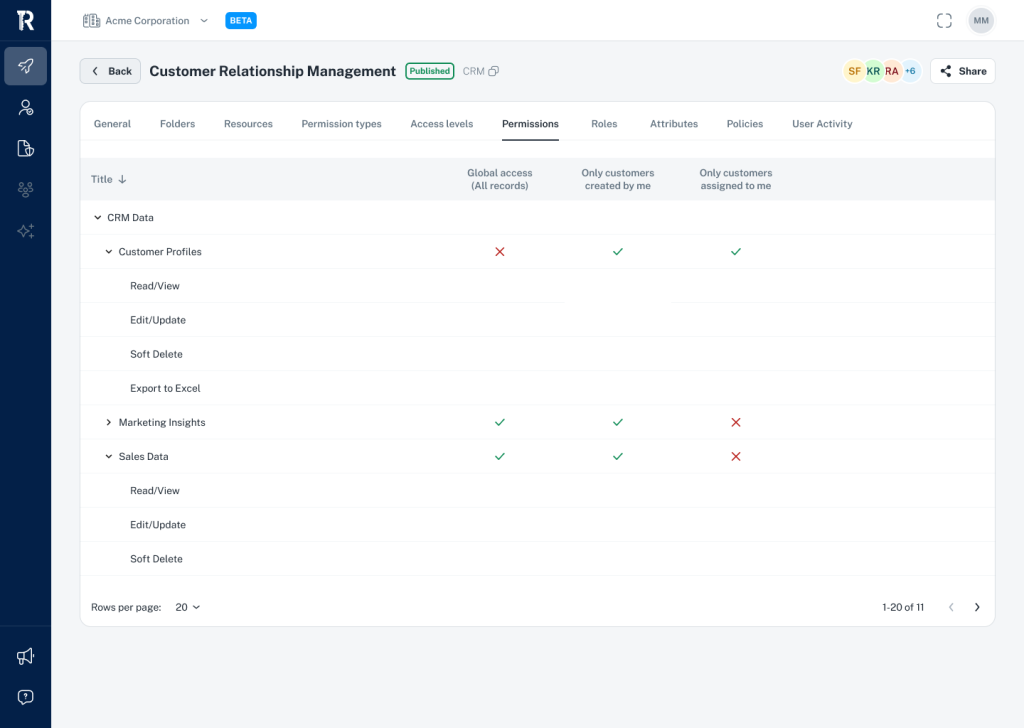
The Permissions section in Roleper allows you to manage the specific actions users are authorized to perform on various resources within a project. These permissions are configured based on predefined permission types and access levels set within the Resources section, ensuring a structured and secure approach to resource management.
Step-by-Step Guide
Navigating to the Permissions Section
- Within your selected project, such as “Customer Relationship Management,” access the Permissions tab. This section presents an overview of all resource-related permissions, reflecting the configurations established in the Resources section.
Understanding the Permissions Structure
The list in this section categorizes permissions by resource titles, such as “Customer Profiles” or “Sales Data.”
Permissions are determined by:
- Permission Types: Defines the actions (e.g., Read/View, Edit/Update, Soft Delete) users can perform.
- Access Levels: Specifies the scope of records users can interact with (e.g., Global access, Only records created by the user, Only assigned records).
Indicators such as green checkmarks (✓) denote granted permissions, while red crosses (✗) indicate restrictions.
Modifying Permissions
- To adjust permissions, you must update the relevant settings in the Resources section, where permission types and access levels are defined. Changes made there will automatically reflect in this Permissions section.
Ensuring Accuracy
- Always verify that updates in the Resources section are correctly saved, as this will directly influence the permissions displayed in this section.
Differentiating Between Permissions and Roles
- Permissions: Govern specific actions that users are allowed to perform on resources, derived from the configurations in permission types and access levels.
- Roles: Represent a broader categorization of user responsibilities and permissions within the project, often encompassing multiple individual permissions.
Roles
Overview
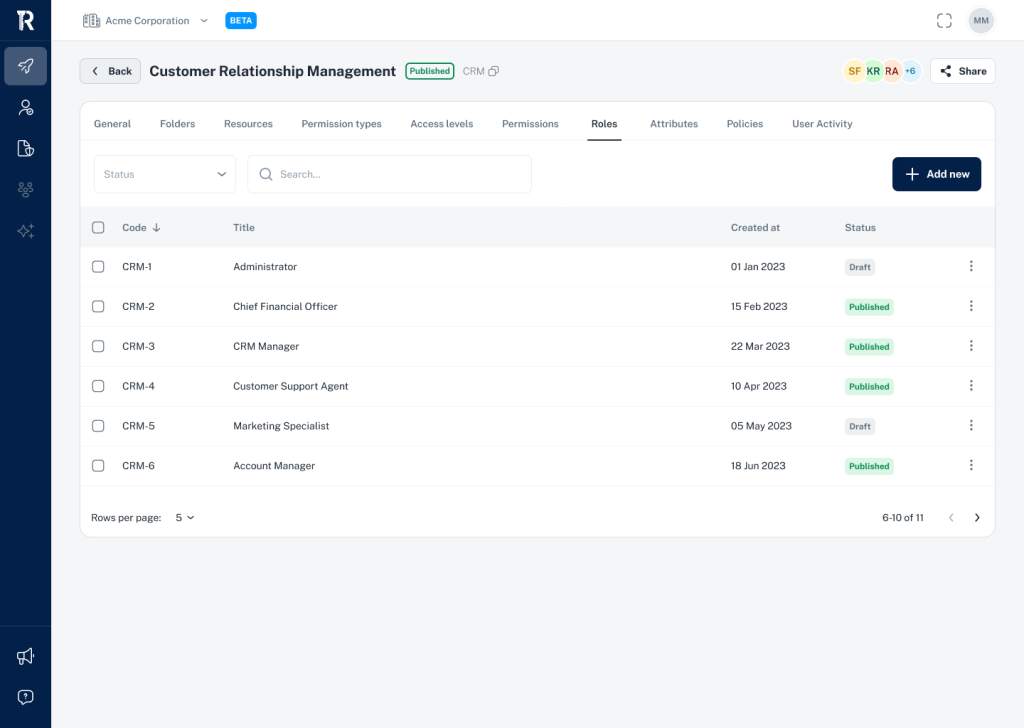
The Roles section in Roleper is designed to manage the various roles within a project, each defining a set of responsibilities and access privileges for users. Roles are a critical aspect of project management, ensuring that users have the appropriate level of access and authority based on their responsibilities within the organization.
Step-by-Step Guide
Navigating to the Roles Section
- Within your selected project (e.g., “Customer Relationship Management”), go to the Roles tab. This section lists all the roles that have been defined for the project.
Understanding the Roles List
- The roles list includes the following columns:
- Code: A unique identifier for each role.
- Title: The name of the role (e.g., Administrator, CRM Manager, Account Manager).
- Created at: The date the role was created.
- Status: Indicates whether the role is currently in Draft or Published status.
- The roles list includes the following columns:
Creating a New Role
- To add a new role, click the + Add new button in the top right corner.
- You will be prompted to provide the role’s title and configure its associated permissions and access levels.
- Once configured, click Save to add the new role to the list.
Managing Existing Roles
- To manage an existing role, click on the three dots (ellipsis) next to the role you wish to edit.
- Here, you can update the role’s title, modify its permissions, change its status (Draft or Published), or delete the role if it is no longer needed.
Assigning Roles to Users
- Roles can be assigned to users within the project, determining what actions they can perform and what data they can access. This assignment ensures that users operate within the defined scope of their role.
Maintaining Role Integrity
- Ensure that roles are regularly reviewed and updated as project requirements evolve. This helps maintain the integrity of access controls and ensures that each user’s role aligns with their current responsibilities.
Attributes
Overview
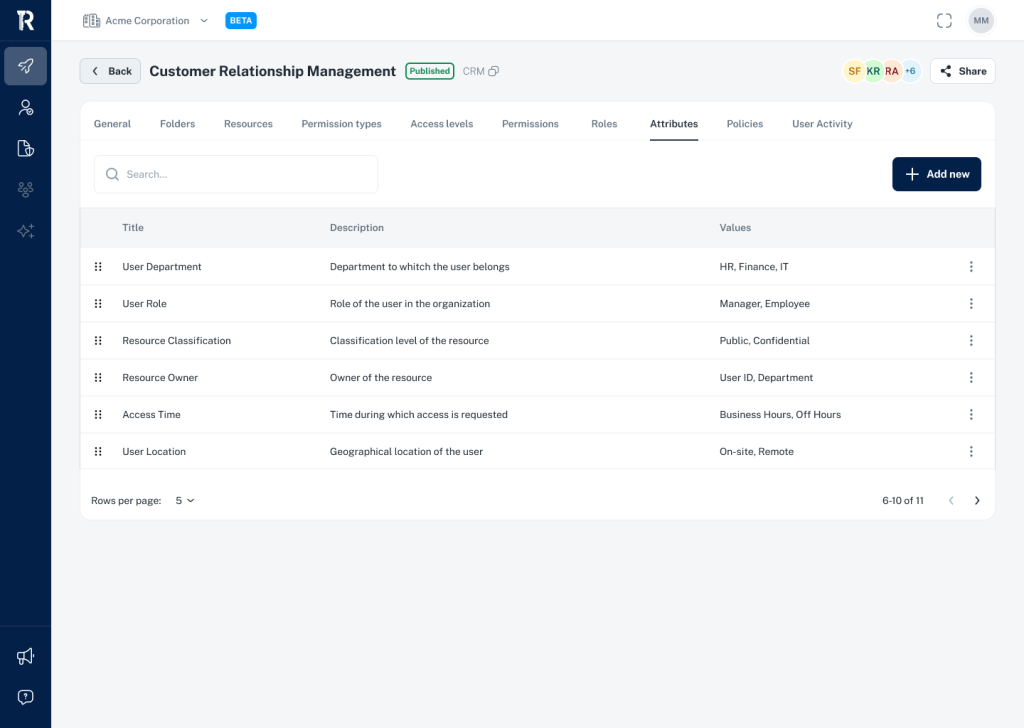
The Attributes section in Roleper is a key component for defining and managing the various attributes that will be used in creating access control policies. These attributes help in categorizing users, resources, and other elements within the project, providing a foundation for precise and effective access management.
Step-by-Step Guide
Navigating to the Attributes Section
- Within your selected project, such as “Customer Relationship Management,” access the Attributes tab. This section lists all the attributes that can be used to define access control policies within the project.
Understanding the Attributes List
- The attributes are displayed in a list with the following columns:
- Title: The name of the attribute (e.g., User Department, Resource Classification).
- Description: A brief explanation of what the attribute represents (e.g., Department to which the user belongs, Classification level of the resource).
- Values: The possible values or categories that the attribute can take (e.g., HR, Finance, IT for User Department).
- The attributes are displayed in a list with the following columns:
Creating a New Attribute
- To add a new attribute, click the + Add new button in the top right corner.
- Provide the title of the attribute, a clear description, and define the possible values or categories that the attribute can have.
- Once completed, click Save to add the attribute to the list.
Managing Existing Attributes
- To manage an existing attribute, click on the three dots (ellipsis) next to the attribute you wish to edit.
- Here, you can update the attribute’s title, description, and values, or delete the attribute if it is no longer needed.
Using Attributes in Access Control Policies
- The attributes defined here will later be used to create detailed access control policies. These policies will leverage the attributes to ensure that access to resources is appropriately managed based on user roles, locations, times, and other relevant criteria.
Ensuring Attribute Accuracy
- Regularly review and update attributes to ensure they remain relevant to the project’s needs. This will help maintain the effectiveness of access control policies and ensure that they accurately reflect the structure and requirements of the organization.
Policies
Overview
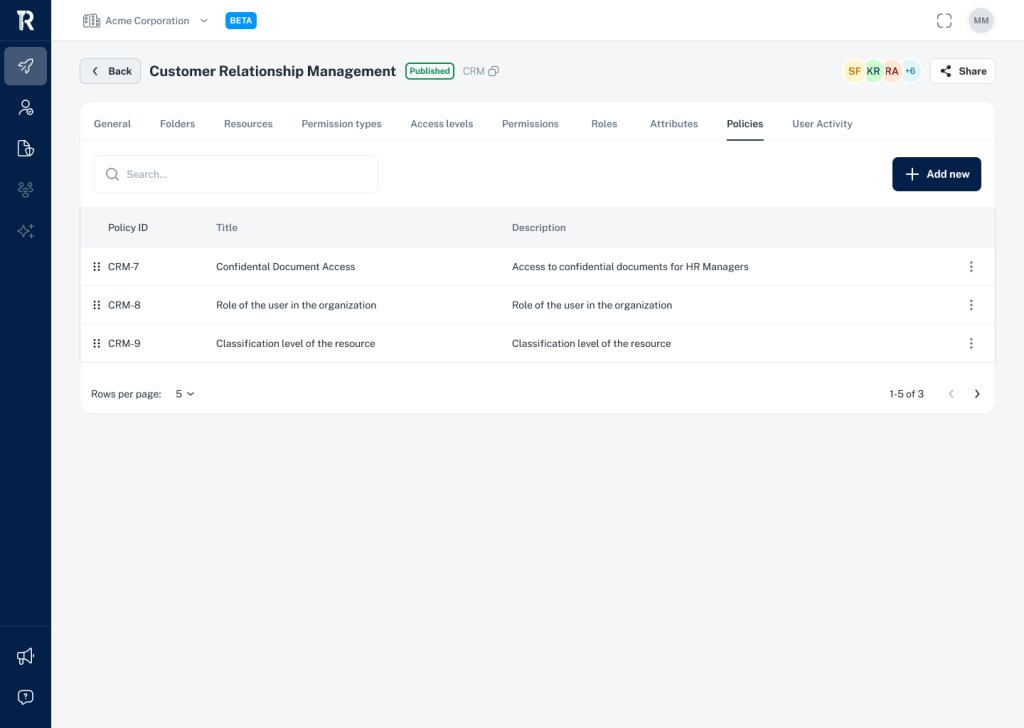
The Policies section in Roleper is where you define and manage access control policies for your project. These policies use the attributes and permissions you’ve set up to control how users interact with resources, ensuring that access is granted according to the organization’s security requirements and operational needs.
Step-by-Step Guide
Navigating to the Policies Section
- Within your selected project (e.g., “Customer Relationship Management”), access the Policies tab. This section lists all the access control policies that govern how users can interact with various resources within the project.
Understanding the Policies List
- The policies are displayed in a list with the following columns:
- Policy ID: A unique identifier for each policy (e.g., CRM-7).
- Title: The name of the policy (e.g., Confidential Document Access).
- Description: A brief explanation of what the policy controls (e.g., Access to confidential documents for HR Managers).
- The policies are displayed in a list with the following columns:
Creating a New Policy
- To create a new policy, click the + Add new button in the top right corner.
- You will be prompted to define the policy’s title, description, and the conditions under which it applies. These conditions will often involve attributes such as user roles, resource classification, and other relevant factors.
- Once configured, click Save to add the new policy to the list.
Managing Existing Policies
- To manage an existing policy, click on the three dots (ellipsis) next to the policy you wish to edit.
- Here, you can update the policy’s title, modify its description, adjust the conditions, or delete the policy if it is no longer needed.
Applying Policies to Resources
- The policies you define here will directly influence how resources are accessed within the project. Ensure that each policy is clearly defined and accurately reflects the access requirements for your organization.
Ensuring Policy Compliance
- Regularly review and update policies to ensure they remain aligned with the evolving security and operational needs of the organization. This helps maintain robust access control and compliance with organizational policies.
User activity

Overview
The User Activity section in Roleper provides a detailed log of actions performed by users within a project. This feature is essential for tracking changes, understanding user behavior, and maintaining accountability within the project. It records activities such as resource edits, permission changes, role assignments, and more.
Step-by-Step Guide
Navigating to the User Activity Section
- Within your selected project (e.g., “Customer Relationship Management”), go to the User Activity tab. This section presents a chronological log of all user activities within the project.
Understanding the Activity Log
- The activity log displays the following details:
- User Name: The name of the user who performed the action (e.g., John Doe, Jane Smith).
- Activity Description: A brief description of the action taken (e.g., “created a new folder in the ‘Acme Corporation'”, “removed the permission type ‘Read'”).
- Timestamp: The time and date when the action was performed, providing context for when changes occurred.
- The activity log displays the following details:
Viewing More Activity Details
- If the list is long, you can click on Show More at the bottom of the section to load additional entries. This allows you to view older activities as needed.
Monitoring and Auditing
- The User Activity section is crucial for monitoring project progress and auditing user actions. Regularly reviewing this log helps ensure that all changes are intentional and authorized, thereby supporting project governance and compliance.
Using the Activity Log for Troubleshooting
- In case of unexpected changes or issues within the project, the activity log can be used to trace back actions and identify the source of the problem. This is particularly useful in collaborative environments where multiple users are involved in the project.
Roles
General
Overview
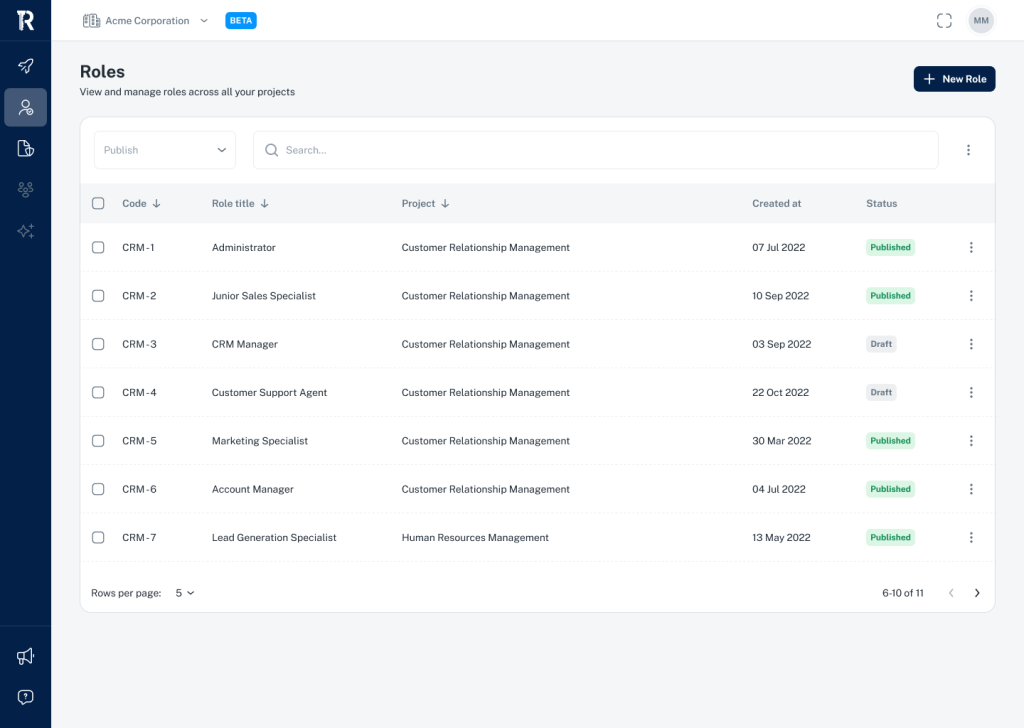
Roles in Roleper are crucial for defining user responsibilities and permissions within and across projects. You can manage these roles either within a specific project or through a central roles management interface that spans all projects. This flexibility allows for consistent role management and assignment, ensuring that users have appropriate access and permissions based on their roles.
Step-by-Step Guide
Navigating to Roles
- Project-Specific Roles:
- Within a project (e.g., “Customer Relationship Management”), navigate to the Roles tab to view and manage roles specific to that project.
- All Projects Roles:
- Use the side navigation bar to access the Roles section, where you can view and manage roles across all projects within your organization. This interface allows for broader management of roles, ensuring consistency across different projects.
- Project-Specific Roles:
Understanding the Roles List
- The roles list displays key details, including:
- Code: A unique identifier for each role (e.g., CRM-1).
- Role Title: The name of the role (e.g., Administrator, Junior Sales Specialist).
- Project: The project to which the role is assigned.
- Created at: The date the role was created.
- Status: Indicates whether the role is in Draft or Published status.
- The roles list displays key details, including:
Creating and Managing Roles
- To create a new role, click the + New Role button in the top right corner.
- Enter the role’s title, assign it to a project, and configure its permissions and access levels.
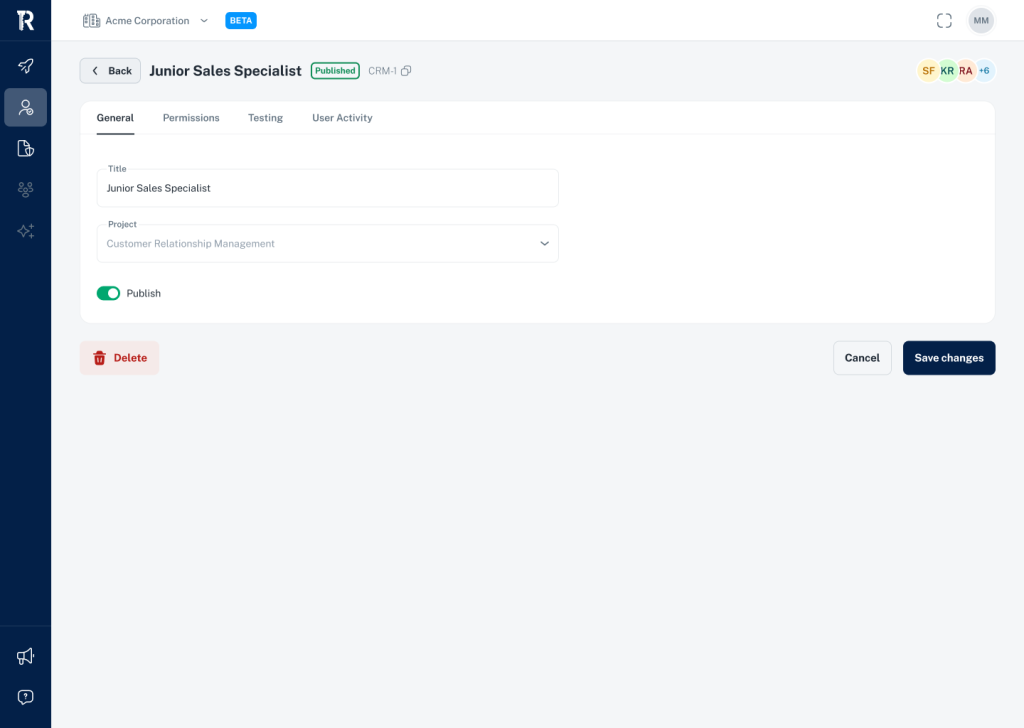
- Roles can be edited by clicking on the role title, which opens a detailed view where you can:
- General: Modify the role’s title and project assignment.
- Permissions: Set or adjust the permissions associated with the role, defining what actions users in this role can perform.
- Testing: Test the role’s permissions to ensure they align with organizational policies.
- User Activity: Monitor the activities of users assigned to this role, providing an audit trail for role-based actions.
Publishing and Deleting Roles
- After configuring a role, ensure it is set to Publish to make it active within the project or across the organization.
- Roles that are no longer needed can be deleted by selecting the Delete option in the role’s detailed view.
Switching Between Projects
- Easily switch between projects while managing roles by using the side navigation bar or returning to the project-specific roles tab. This allows for seamless role management across multiple projects.
Permissions
Overview
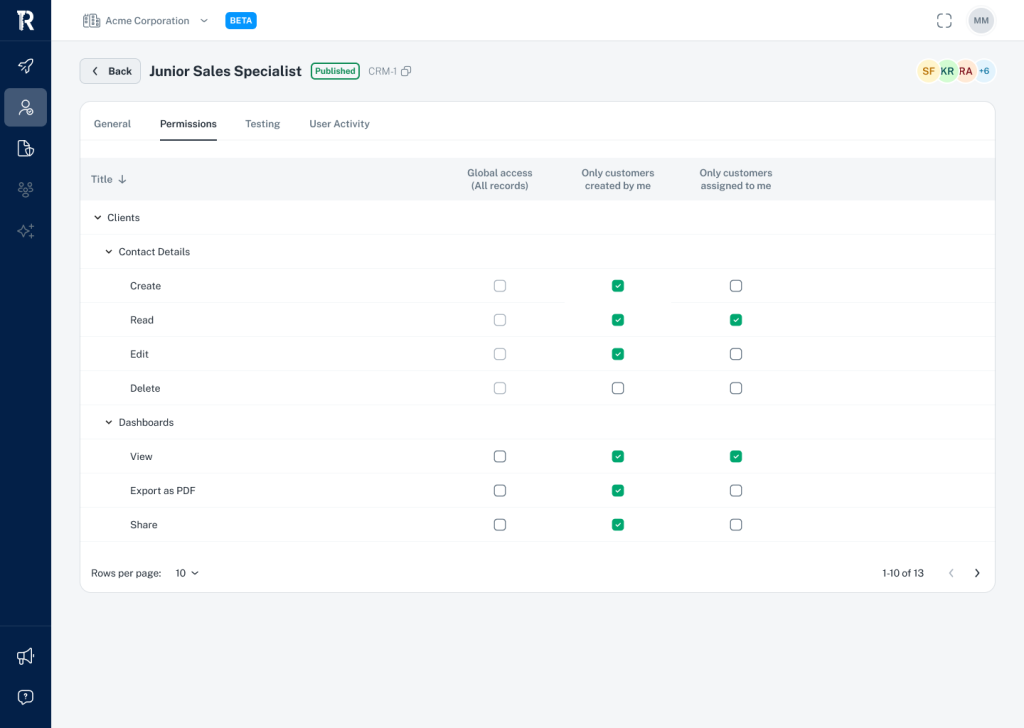
Permissions under roles in Roleper define the specific actions that users assigned to a particular role can perform on different resources. These permissions are categorized based on the scope of access, such as global access to all records, access to records created by the user, or access to records assigned to the user.
Step-by-Step Guide
Accessing Role Permissions
- To manage permissions for a specific role, navigate to the Roles section, either within a project or across all projects.
- Select the role you wish to configure (e.g., “Junior Sales Specialist”).
- Click on the Permissions tab within the role’s detailed view.
Understanding the Permissions Layout
The permissions are displayed in a matrix format, organized by:
- Title: The resource or action (e.g., Clients, Dashboards).
- Permission Types: Specific actions that can be taken (e.g., Create, Read, Edit, Delete, View, Export as PDF, Share).
- Scope of Access:
- Global access (All records): Permissions apply to all records within the resource.
- Only customers created by me: Permissions apply only to records created by the user.
- Only customers assigned to me: Permissions apply only to records explicitly assigned to the user.
Green checkmarks (✓) indicate that the permission is granted for the respective action and scope, while unchecked boxes indicate that the permission is not granted.
Configuring Permissions
- To grant or revoke permissions, simply check or uncheck the boxes corresponding to the desired actions and scope of access.
- Ensure that the permissions align with the intended responsibilities of the role. For example, a Junior Sales Specialist might have read and edit permissions for customer contact details they have created or that are assigned to them, but might not have delete permissions.
Saving Changes
- After configuring the permissions, click Save changes to apply the settings. This ensures that users assigned to this role will have the appropriate access based on the permissions you’ve set.
Testing and Reviewing Permissions
- Utilize the Testing tab within the role’s detailed view to simulate the role and verify that the permissions are functioning as expected. This helps ensure that the permissions configuration is correct and that there are no unintended access rights.
Testing

Overview
The Testing section under roles in Roleper allows you to verify that the permissions configured for a specific role are functioning correctly. This section records the tests performed, the user who conducted the test, and the results, helping ensure that roles are properly set up to meet organizational needs.
Step-by-Step Guide
Accessing the Testing Section
- Navigate to the Roles section within your project or across all projects, and select the role you want to test (e.g., “Junior Sales Specialist”).
- Click on the Testing tab within the role’s detailed view. This section displays a list of all tests conducted for this role.
Understanding the Testing Log
- The testing log includes the following columns:
- Code: A unique identifier for each test (e.g., CRM-1-T1).
- Tested by: The name of the user who performed the test (e.g., John Doe, Mia Hernandez).
- Description: A brief description of what was tested.
- Created Date: The date and time when the test was conducted.
- Test Result: The outcome of the test, indicating whether it Passed or Failed.
- The testing log includes the following columns:
Adding a New Test
- To conduct a new test, click the + Add new button in the top right corner.
- Fill in the required details, such as the description of the test, and then execute the test to verify the role’s permissions.
- Once the test is completed, the results will be automatically logged in this section.
Reviewing Test Results
- Review the test results to ensure that the permissions are functioning as expected. A Pass result indicates that the role’s permissions are correctly configured, while a Fail result suggests there may be issues that need to be addressed.
Troubleshooting and Adjustments
- If a test fails, revisit the Permissions tab to adjust the permissions as necessary. After making changes, you can re-run the test to confirm that the issue has been resolved.
Maintaining a Testing Log
- Keep a record of all tests performed to track changes and improvements in role configuration over time. This log is crucial for auditing and ensuring continuous compliance with organizational standards.
Policies
General
Overview
Access control policies in Roleper define the rules and conditions under which users can access and interact with various resources. These policies can be managed within a specific project or across all projects in your organization, providing flexibility in how you control access to sensitive data and resources.
Step-by-Step Guide
Navigating to Policies
- Project-Specific Policies:
- Within a project (e.g., “Customer Relationship Management”), navigate to the Policies tab to view and manage policies specific to that project.
- All Projects Policies:
- Use the side navigation bar to access the Policies section, where you can view and manage policies across all projects within your organization. This central interface allows you to apply consistent policies across different projects.
- Project-Specific Policies:
Understanding the Policies List
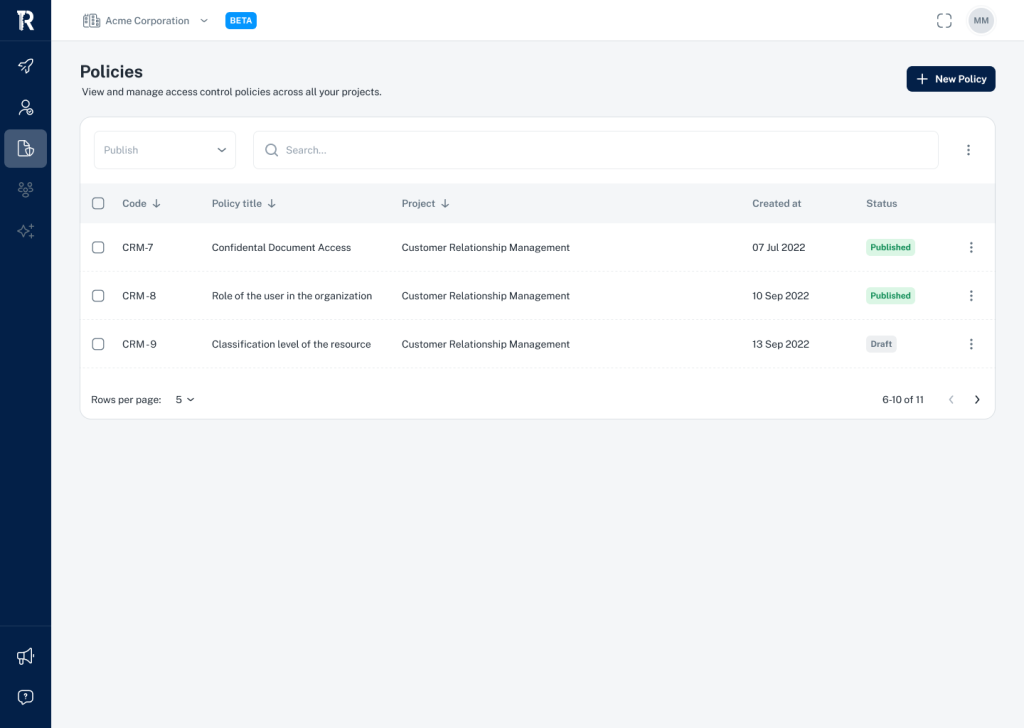
- The policies list includes key details such as:
- Code: A unique identifier for each policy (e.g., CRM-7).
- Policy Title: The name of the policy (e.g., Confidential Document Access).
- Project: The project to which the policy is assigned.
- Created at: The date the policy was created.
- Status: Indicates whether the policy is in Draft or Published status.
- The policies list includes key details such as:
Creating and Managing Policies
- To create a new policy, click the + New Policy button in the top right corner.
- Enter the policy’s title, assign it to a project, and provide a detailed description of the policy.
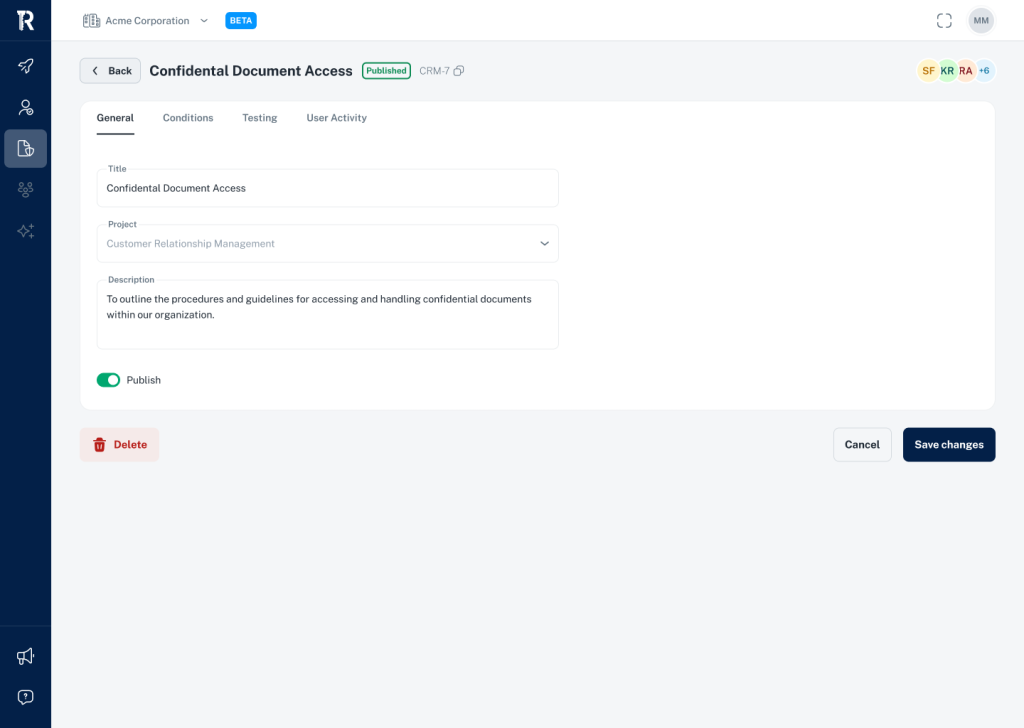
- Policies can be edited by clicking on the policy title, which opens a detailed view where you can manage:
- General: Modify the policy’s title, project assignment, and description.
- Conditions: Define the specific conditions under which the policy applies, including attributes and access levels.
- Testing: Verify that the policy functions as intended by running tests.
- User Activity: Monitor actions taken under this policy, providing an audit trail.
Publishing and Deleting Policies
- After configuring a policy, set it to Publish to make it active within the project or across the organization.
- Policies that are no longer needed can be deleted by selecting the Delete option in the policy’s detailed view.
Applying Policies Across Projects
- When accessing policies through the central interface, you can apply consistent access control rules across multiple projects. This ensures that sensitive data is protected according to the same standards organization-wide.
Conditions
Overview
The Conditions/Rule tab within the Policies section of Roleper is where you define the specific criteria that govern access control within your organization. This powerful feature allows you to set precise conditions based on user attributes, roles, and resource classifications, ensuring that access is granted only under the correct circumstances.
Step-by-Step Guide
Navigating to the Conditions Tab
- After selecting or creating a policy (e.g., “Confidential Document Access”), navigate to the Conditions tab. This is where you will define the logic that controls access based on specific user and resource attributes.
Understanding the Conditions Interface
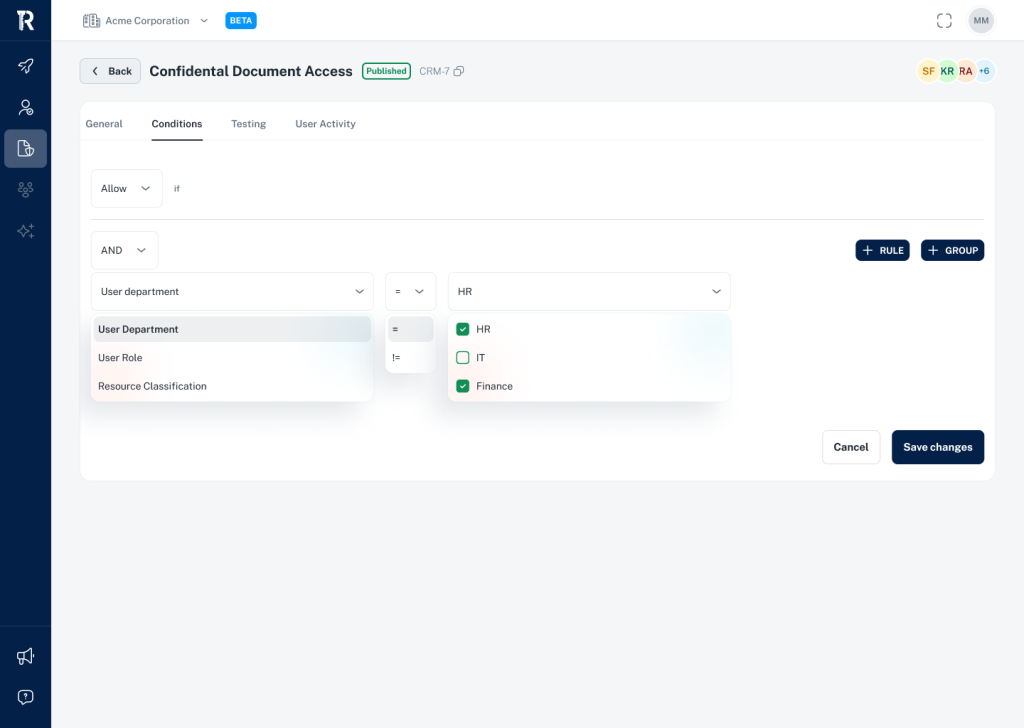
- The interface allows you to create complex rules using a combination of logical operators (e.g., AND, OR) and conditions based on attributes such as:
- User Department: The department to which the user belongs (e.g., HR, IT, Finance).
- User Role: The role assigned to the user within the organization (e.g., Manager, Employee).
- Resource Classification: The classification level of the resource (e.g., Public, Confidential).
- The interface allows you to create complex rules using a combination of logical operators (e.g., AND, OR) and conditions based on attributes such as:
Creating a New Rule
- Begin by selecting whether you want to Allow or Deny access based on the conditions you are about to set.
- Use the dropdown menus to select the attribute and condition (e.g., User Department = HR).
- Combine multiple conditions using logical operators to refine the access control. For example, you might set a rule to allow access only if the User Department is HR AND the Resource Classification is Confidential.
Adding Rules and Groups
- Click + RULE to add additional conditions to the current logic set.
- If you need to create more complex conditions, use + GROUP to organize rules into logical groups. This allows for sophisticated access control logic, combining multiple conditions across different attributes.
Saving and Testing Your Conditions
- After setting your conditions, click Save changes to apply the logic to the policy.
- It’s advisable to navigate to the Testing tab to verify that the conditions work as expected. This ensures that the rules are correctly implemented and that access is granted or denied in alignment with your organizational policies.
Reviewing and Adjusting Conditions
- Regularly review the conditions to ensure they continue to meet the security and operational needs of your organization. Adjust the logic as necessary to accommodate changes in roles, departmental structures, or resource classifications.
Testing
Overview
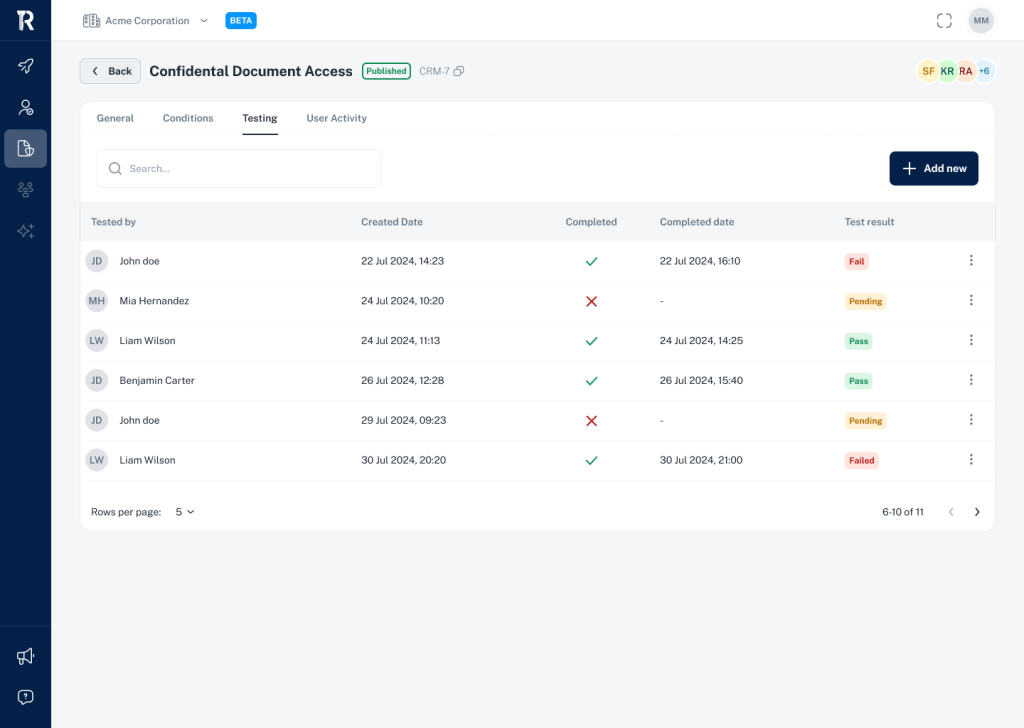
The Testing section under the Conditions/Rule tab in policies is essential for verifying that the conditions you’ve set are working as intended. This section logs the tests conducted, the users who performed them, and the outcomes, allowing you to ensure that access controls are properly implemented and enforced.
Step-by-Step Guide
Accessing the Testing Section
- After defining the conditions for a policy (e.g., “Confidential Document Access”), navigate to the Testing tab. This section provides a log of all tests related to the policy conditions.
Understanding the Testing Log
- The log includes critical details such as:
- Tested by: The name of the user who conducted the test (e.g., John Doe, Mia Hernandez).
- Created Date: The date and time when the test was initiated.
- Completed: Indicates whether the test was completed.
- Completed Date: The date and time when the test was finalized.
- Test Result: The outcome of the test, showing whether the conditions resulted in a Pass, Fail, or are still Pending.
- The log includes critical details such as:
Adding a New Test
- To initiate a new test, click the + Add new button in the top right corner.
- Specify the details for the test, including the conditions being tested and any relevant parameters.
- Run the test to verify that the conditions enforce the policy as expected.
Reviewing Test Results
- After a test is completed, review the Test Result to determine whether the conditions are functioning correctly.
- Pass: Indicates that the conditions are correctly set and enforced.
- Fail: Suggests that there may be an issue with the conditions, requiring further investigation.
- Pending: Indicates that the test has not yet been completed or reviewed.
- After a test is completed, review the Test Result to determine whether the conditions are functioning correctly.
Troubleshooting and Adjustments
- If a test fails, return to the Conditions tab to review and adjust the logic or criteria. After making the necessary changes, re-run the test to confirm the corrections.
Maintaining an Audit Trail
- The Testing section serves as an audit trail for all policy condition verifications. Regularly reviewing this log helps maintain the integrity of your access control policies and ensures continuous compliance with organizational standards.
